Digital Photography and Imaging - Week 7
18.5.2023 (Week 7)
Vanessa Kei Kurniadi / 0360525 / Bachelor or Design in Creative Media
Digital Photography and Imaging
Week 7 - Double Exposure
LECTURES
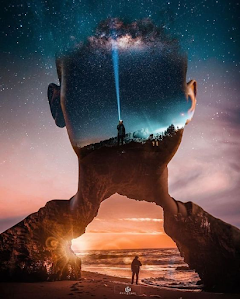
This week we're gonna learn about double exposure for our next project.
Double exposure photography refers to merging multiple images. The goal is to
make them surreal, emotional, or humorous. They usually feature silhouettes.
Double exposure effect may look complicated at first. But it’s easy to make
in-camera and in Adobe Photoshop. We don’t need a double exposure camera, as
there are a few other ways you can create them.
In the editing world, you have endless possibilities. We can transform
ordinary photographs into powerful masterpieces.

fig 1.1 Double exposure
TUTORIALS


fig 3.2 base for my double exposure work
My photo is a bit cut on the side, so I have to keep my photo to the edge of the canvas, so I had an idea to make myself fade and merge into something. After looking into some photos I decided to use the city lights image and rotate them. I also turned my photo into a grayscale so it fits even better with the image.


For the tutorial we are given further and detailed instructions on how to make
double exposure edit in Adobe Photoshop. Our task is to try to make this image
fig 2.1 Double exposure exercise
There's quite a lot of steps to follow here, but to summarize it:
- Use the masking tool to select the area we wanna put the double-exposure
object
- Use a solid color and put it under the portrait to make the background
- Use the levels adjustment layer to create more contrast
- Put the forest image using clipping mask on the portrait's face, and
change the color of the canvas background to match the background of the
forest.
- Select the masked layer and select white to reveal the face (in masked
layer, black is used to hide the area and white is used to reveal it)
- Duplicate the forest image and flip vertical to make the forest on the
bottom
- Add the birds image and use darken/multiply to remove the white background
- Add the clouds image
- Add adjustment layer → gradient map and choose the type that we want, and
lower the opacity
(for the last step I usually changed the blending modes to overlay or
multiply. They create a unique and nice colour into the image)
PRACTICAL
Double exposure is actually quite a fun thing to do. I had a great time experimenting on different gradient maps, and the steps are not too difficult to follow either.
For the first task there's not much to explain. I only followed the instruction step by step. If there's any difference, it's probably the minor difference in the parts of the face I revealed, the placement of the forest, and the gradient map.
The gradient map I used is Orange_06, with 27% opacity. Here is how it looks;
fig 3.1 Double exposure exercise result
Part 2
For the second part, I should make another double-exposure photo but using my own picture. I decided to use this image for my base.
fig 3.2 base for my double exposure work
The final step is to give a gradient map, and I decided to use Blue_27 with overlay blending mode and 100% opacity.
fig 3.3 Screenshot of my work
Final look:

fig 4.1 Part 1 Final Look

fig 4.2 Part 1 Final Look


Comments
Post a Comment