Video and Sound Production - Exercises & Project 1
22.4.2024 - 13.5.2024 (Week 1 - Week 4)
Vanessa Kei Kurniadi / 0360525
Bachelor
of Design (Hons) in Creative Media
Video and Sound Production - Exercises
& Project 1

INSTRUCTION
EXERCISES
Exercise 1: Mints Video
For our first exercise, we were instructed to use the clip provided by Mr
Martin, and arrange them together in a single video.
Mr Martin gave some tutorial to those who first touched Adobe Premiere Pro.
Thankfully I have some experience working with Premiere Pro, so I am already
used to the steps he is showing at that time.
It might be slightly different than Mr Martin's tutorial since I went ahead on
my own, but this is how I did it.

fig 1.1.1 Importing the clips into the project in Premiere Pro, week 1
(22.4.2024)
By double clicking on the empty media browser (the one on the left,
highlighted with blue outline), I imported all the clips that I have
downloaded beforehand from the drive, and clicked "Open". By selecting all
of them, I saved time instead of importing them one by one.
Now that all the clips are there, I just have to put them together by
arranging the clips in the timeline section, next to the media browser.
Mr Martin said the clips are already organize to make it easier for the
ones who just started. That makes it easier for me. I just selected all
the clips on the left side by pressing shift and clicking the first clip
and the last clip, selecting all clips including those in between, and
then dragged them to the timeline section. The clips are automatically put
on the timeline one after another in the same order as the clips
themselves, and we're done!

fig 1.1.2 dragging the clips into the timeline in Premiere Pro, week
1 (22.4.2024)
If needed, on the top middle section (one highlighted in blue in the
picture below), I can preview the final look of the timeline. That way I
can see if there is a mistake in the final result.

fig 1.1.3 checking the full result in the preview panel, week 1
(22.4.2024)
Result
fig 1.2.1 Smints video result, week 1 (22.4.2024)
The second exercise is just like the first one, but with a little more
challenge: the clips aren't arranged in order, so we have to figure out
the order and arrange the clips one by one to make a full whole video. The
purpose of this exercise is for us to get used to the app and learn how to
do the basics by ourselves.
There's only one problem for me: the clips are so short and cut between
the change of scenes, so it's hard to really know which clip is from when.
So I opened my cheat sheet (YouTube) and looked for the right order of the
clips. I found this clip named "Super Bowl 50: Doritos Ad" which was
posted 8 years ago. I watched this clip alongside working on the project
to see which part each clip goes into.

fig 1.2.3 arranging the clips in the correct order in Premiere
Pro, week 1 (22.4.2024)
Result
fig 1.2.4 Doritos Ad video result, week 1 (22.4.2024)


 fig 1.3.2 Raw sources provided by Mr Martin, week 2
(29.4.2024)
fig 1.3.2 Raw sources provided by Mr Martin, week 2
(29.4.2024)
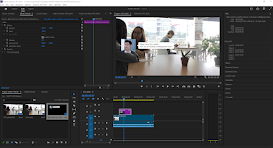
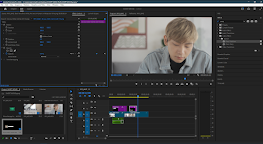


fig 2.1.3 Frontal medium shot, week 2 (6.5.2024)


I put the music into the timeline and cut the music where the
clip ends. As a finishing touch I also put some cross dissolve
at the beginning of the clip and fade to black at the end. For
the audio, I put constant gain at the beginning of the music,
and exponential fade at the end.


On the 2nd week's asynchronous class, we were taught about The Three Act Structure. The Three Act Structure is the 3 main parts that makes a good movie. The parts itself are called "The Setup", "The Confrontation", and "The Resolution".


Week 3 Asynchronous Class Reflection

There are 3 main production phases for film making:
pre-production, production, and post-production.


Project 1A: Audio Dubbing

After the sheet is done and all sound effect was done, I proceeded to record my own voice, while referencing back and forth to the original movie. Not only I have to do voiceover for 2 elderly woman with deep voice, I have to dub the voice of a man.


fig 3.1.5 tweaking sound effect for the clips, week 4 (13.5.2024)


Next is the muffled noise. For this effect, I also followed
roughly the direction from the tutorial video (Filter and EQ >
Parametric Equalizer) and then adjusted it as needed.


Next is a voice inside an underground cave. For this one I aim to
give it a more echoing effect. So for this purpose I gave it the
Reverb > Ethereal effect.

Last but not least is the Alien/Orc sound. Now this one is a bit tricky. I decided to make the alien noise, but the idea of an alien noise itself is a bit ambiguous. But I try not to think too much of it and try out some of the effects in my disposal because the alien sound isn't included in the tutorial video.


Final Results
REFLECTION
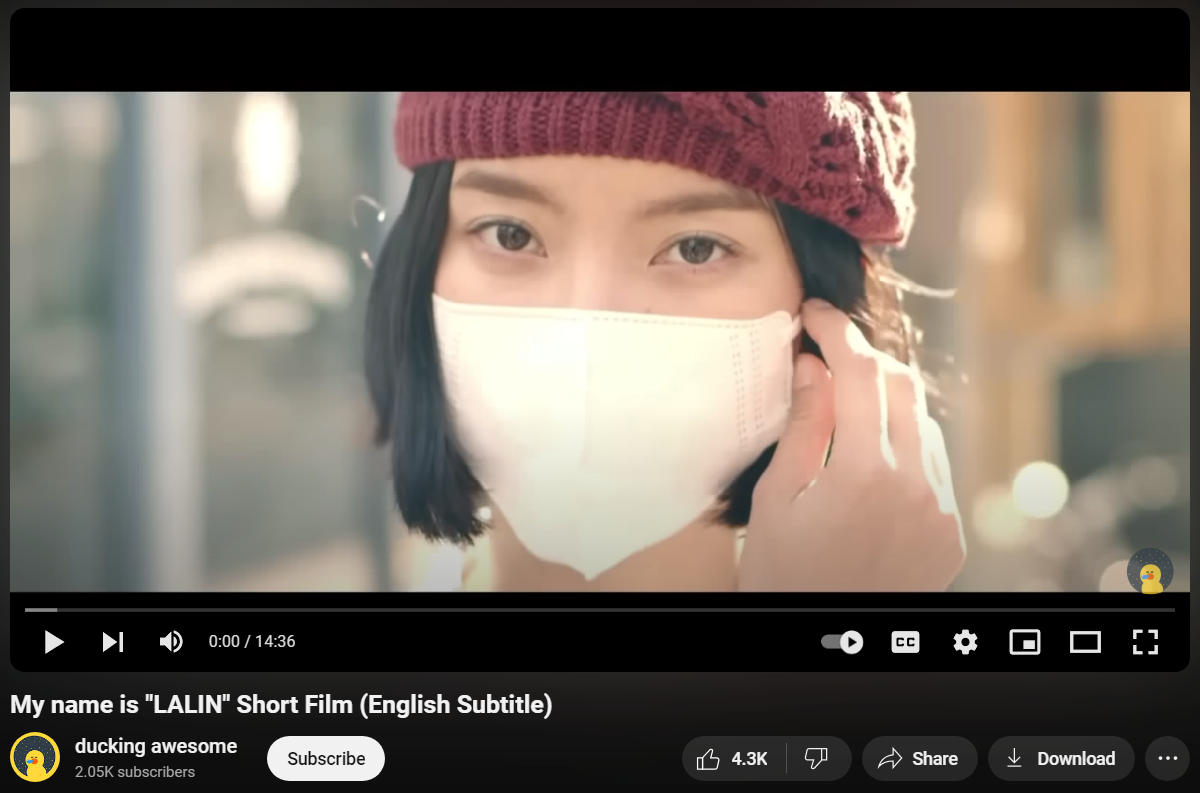
Exercise 3: Lalin's Remake
For this exercise, we were given the task to remake a scene from the
Thailand's short movie "Lalin".
fig 1.3.1 Lalin short movie
We are given some shooting remade scenes that our senior did, and we
have to assemble it into a similar clip with the original movie. We
were given the raw cuts, the phone notification sounds, and the
storyboard. Among the clips there are also an example video on how we
should arrange the clips.
I downloaded the clips and inserted it into Premiere Pro to
assemble. While working on the first clip, I feel like the camera
was a bit unstable. So I used the Video Effect > Distort >
Warp Stabilizer to make the shot more stable, and then go on with
the video assembling. I also deleted the original audio because
they are very noisy.
fig 1.3.3 Lalin video remake progress 1 - applying
stabilizer for the first clip, week 4 (18.5.2024)
When I reached the part to put the text "Astronaut Nut is
logging out", I realized the white text doesn't go well with the
bright background. So I followed the example video and put some
shadow under the text so it's still quite visible.
fig 1.3.4 adding shadow to the text against bright
background, week 4 (18.5.2024)
The social media profiles are also not on the example, but it
is on the assets provided, so I try to put them according to
the original video.
fig 1.3.5 putting in the social media profiles on the
clip, week 4 (18.5.2024)
One thing I also noticed is some text bubbles are missing
from the provided source, and it kinda bugged me. I'm not
sure if I'm allowed to do this but I made some new text
bubble by changing the text inside them using photoshop.
fig 1.3.6 Making and putting speech bubbles that I
made into the clip, week 4 (18.5.2024)
Lastly, there are some texts that were provided didn't
have their respective scene if compared to the original.
The first one was the plain phone background, and the
scene where Lalin looks at her reflection with the
expression as if she's gonna start crying anytime soon,
and goes back into the bathroom stall.
I could repeat the face of the girl again, but that face
has been repeated so many times that won't look nice if I
use the same clip again. So I made some improvisation. I
put the text on the guy's scene, and it disappear when he
disappears.
fig 1.3.7 Making the plain background myself and
improvise on the last text, week 4 (18.5.2024)
Final Result
fig 1.3.8 Lalin Remake Final Result, week 4
(19.5.2024)
Week 1 Asynchronous Class Reflection
On week 1's asynchronous class, we were taught about different types
of shots in cinematography:
- Extreme Wide Shot (EWS): Captures a broad view of the setting, often used to establish location and environment.
- Wide Shot (WS): Shows the entire subject and their surroundings, giving context and a sense of space.
- Medium Shot (MS): Frames the subject from the waist up, balancing focus between the subject and their environment.
- Medium Close-Up (MCU): Captures the subject from the chest up, emphasizing facial expressions while still showing some background.
- Close-Up (CU): Focuses tightly on the subject's face or a specific detail, highlighting emotions and details.
- Extreme Close-Up (ECU): Zooms in on a particular part of the subject, such as eyes or hands, to emphasize minute details.
- Over-the-Shoulder Shot (OTS): Frames the subject from behind another person’s shoulder, often used in conversations to show the speaker's perspective.
- Point of View Shot (POV): Simulates the view of a character, immersing the audience in the character’s experience.
- High Angle Shot: Positioned above the subject, looking down, making the subject appear smaller or weaker.
- Low Angle Shot: Positioned below the subject, looking up, making the subject appear larger or more powerful.
- Dutch Angle (Tilted Shot): The camera is tilted sideways, creating a disorienting effect often used to convey tension or unease.
The given videos plus additional explanation by Mr Martin during class
helps a lot with my understanding. Theorically, the shots aren't that
hard to understand, since their purposes are quite straight forward
and there are LOTS of examples in movies on the internet these days.
But it will take some time and practice to actually apply them
properly in my own shots.
What I think I would need to practice more is how to get a softer
background when I need it in my shots, and to make sure all my shots
are properly done, with the character in the center, and the use of
space around main subjects or objects.
Quiz result:
1st attempt: 13/15
2nd attempt: 15/15
fig 1.3.1 Week 1 Quiz Result, week 4 (18.5.2024)
Exercise 2: Adding captions on Premiere Pro
On our second exercise we are going to learn on how to put captions
into videos using Premiere Pro. We are going to use our video shots
that we shot from school and use them for the exercise.
I was paired with a classmate and we went to shot outside class. Here
are some of the shots my partner made of me:
fig 2.1.1 Close-up shot, week 2 (6.5.2024)
fig 2.1.2 Soft background medium close-up shot, week 2
(6.5.2024)
fig 2.1.4 Extreme closeup shot, week 2 (6.5.2024)
fig 2.1.5 Side angled medium shot, week 2 (6.5.2024)
fig 2.1.6 Soft background 3/4 angled medium close-up shot, week 2
(6.5.2024)
fig 2.1.7 Low angled wide shot, week 2 (6.5.2024)
fig 2.1.8 Eye leveled medium wide shot, week 2 (6.5.2024)
What I need to do next is to put all these clips into Adobe Premiere
Pro to add captions.
fig 2.1.9 Importing the raw videos into Premiere Pro, week 3
(12.5.2024)
I checked and I just realized that most of my clips are not 5
seconds. So I inserted the clips and changed their duration into 5
seconds each. I also speed up a bit the one that has more than 5
seconds, so the clips all have the same duration.
To change the duration of a clip, I do it by right clicking the
specific clip that I want to edit, choose "speed/duration", and
changing the duration into "00:00:05:00". As you can see on the
image below, for the 3/4 angled shot, the clip is slowed down into
10.66% its original speed.
fig 2.1.10 modifying the speed of a clip, week 3
(12.5.2024)
I also noticed that my wide shot is a bit tilted. So I give some
modification by rotating the clip a little bit. This resulted in
the edges showing on the video, so to prevent that I zoomed in on
the clip to remove the edges.
fig 2.1.11 fixing the angle of the tilted video, week 3
(12.5.2024)
After inserting all the clips into the timeline, I feel like the
audio is disturbing, because it's just some murmurs and ambience
from the location. The fact that the clips are short and the
audio abruptly appear and disappear. So I thought I could remove
the useless audio.
To do this, I just lock the video layer, and dragged and
selected all audio from the timeline, and pressed the backspace
button on my keyboard to delete.
Now that the audio is gone, the video is very quite which feels
weird. So I try to give some music by adding a copyright free
music from YouTube. After some looking, I chose the Stylish
Event Fashion Vlog by Infraction. I used a YouTube to MP3
converter and put the audio into the Premiere Pro
fig 2.1.12 Stylish Event Fashion Vlog by Infraction
fig 2.1.13 adding the audio and video transition for
effects, week 3 (12.5.2024)
Here is my final timeline:
fig 2.1.14 my final time line, week 3 (12.5.2024)
Result
fig 2.1.15 Shots exercise video final result, week 3
(12.5.2024)
Week 2 Asynchronous Class Reflection
On the 2nd week's asynchronous class, we were taught about The Three Act Structure. The Three Act Structure is the 3 main parts that makes a good movie. The parts itself are called "The Setup", "The Confrontation", and "The Resolution".
To summarize:
- Act 1: The Setup
- Introduce the audience to the protagonists and the world they live in. The act usually ends with the inciting incident, which is the start of act 2.
- Act 2: The Confrontation
- The longest and most complex of the 3 acts.
- Introducing the conflict/problem that the main character must solve.
- Is made of 2 parts. First part is when the main character tries to work their way to solve the problem to achieve their goal, and the second part is when they are face with a significant setback which force them to try a different approach.
- Usually ends when the main character is faced with a major turning point, which brings us to the third act which is the final act.
- Act 3: The Resolution
- Consist of the climax (the most intense and dramatic part of the story) and the resolution of the movie.
- The part where the main protagonist takes the big step to confront their final challenge, where the stakes are high and the tension is at its peak.
- Ends with the denouement, where all loose ends are tied up, and the story is wrapped with a good conclusion, whether it is a bad or good ending.
Mr Martin has given us 2 movies for us to analyze. First one
is a movie called "Everything, Everywhere, All at Once", and
the second one is a short Thailand movie called "Lalin", and
we are given several questions to practice and understand the
acts better.
- Which part is act 1, act 2, act 3 respectively? Describe each act with ONE paragraph only.
- What is the inciting incident in the movie?
- What is the midpoint scene in the movie?
- What is the Climax scene in the movie?
- What is the theme of the movie?
Everything, Everywhere, All at Once
fig 2.2.1 Everything, Everwhere, All at Once
- The Acts Structure:
- Act 1 is where Evelyn was doing her daily routine at her home and her laundry business, with her family. She seems very busy and didn't really have time to have a good talk with any of her family members, and it's like she's always racing against time every single day.
- Act 2 is on the part where Evelyn meets Alpha Waymond, which basically showered her with pieces of information about the other universes and her other alternative selves, and about Jobu Tubaki, which she later found out is her own daughter, Joy from another universe. She tried to keep up with the never ending encounter with enemies and even Jobu, she decided that she want to try to save Jobu instead of killing her.
- Act 3 is when Evelyn has pushed her mind too far to the point it broke and brought her across all the multiverse. Jobu's words started to get into Evelyn, and she started to ruin every Evelyn's lives in the other universes. But then Waymond's word while protecting Evelyn touched her heart, so Evelyn decided to use her power to spread kindness and help every enemy in front of her, including not giving up on Jobu. After the fight is settled, the family came back to their daily routine, but as a harmonious happy family.
- The inciting incident was when Evelyn met with Alpha Waymond and started to know about the alternative universes.
- The midpoint is when Evelyn pushed her mind too hard and broke it.
- Climax is when Evelyn goes into an epic fight and push through all enemies to stop Jobu from entering the bagel.
- The theme of the movie is about family, value of life, and life choices.
Lalin
fig 2.3.1 Thailand Short Movie "Lalin"
- The Acts Structure:
- Act 1 is when Lalin tells the audience about her life story, where she was bullied for her looks, so whe fled to study in Sapporo, Japan and start a new life, and the fact that she is a social media star even though she's always using filter. She always use a mask even at home because she really hates her face. But the specific reason is not yet revealed.
- Act 2 is when a guy with the username Astronaut Nut requested Lalin's help with translating his book into Japanese. Since then they talked a lot and most likely developed feelings towards each other. They faced time each other a lot, but when he asked why Lalin always used a mask, she had to lie. But after a while, Astronaut Nut decided to give her a visit and to see her real face.
- Act 3 is when Astronaut Nut gave a surprise visit to Sapporo to deliver his book. They planned to meet at a cafe, but Lalin was scared. She saw her face in the mirror, full of acnes, and decided that she's not ready to show that to him and told him to leave. After he left, she opened the book that he left for her on the table, and read it. Astronaut Nut is actually Lalin's high school fat friend who admire her, and the book was his letter to her. After that Lalin didn't put the mask anymore and embrace her true self, and ran after him, but unfortunately he's already gone. But he had changed her mind and she want to start showing the world her real self.
- The inciting incident was when Astronaut Nut contacted Lalin to translate his book.
- The midpoint was when Astronaut gave Lalin a visit, which terrifies Lalin.
- The climax is when Lalin decided to embrace her true self and running after Astronaut Nut.
- The theme of the movie is about self love and confidence.
Quiz Result
Attempt 1: 8/10
Attempt 2: 10/10
fig 2.4.1 Week 2 Quiz Result, week 4 (18.5.2024)
Week 3 Asynchronous Class Reflection
Story board is a visual representation of a film,
animation, or video game, much like a comic strip. It's made
up of a series of illustrations or images displayed in
sequence for the purpose of pre-visualizing a motion picture,
animation, motion graphic or interactive media sequence. It is
usually done by the story board artist in pre-production phase
to help out with the film making. It can be used as a guide of
settings, placement, dialogues, movements, etc. during
filming; and it will help during editing process to arrange
and assemble the scenes in order.
I watched the video of Josie making the story board, and I am
impressed on the details and thoughts that came with each of
the frames. Each panel needs to convey the location,
character, placement of the character and camera, their
position, and their expression or gestures according to what
they are feeling. Not only that, it has to be clear enough for
the director to see and evaluate. Afterall, that is what the
storyboard is for: to help the director with the
filming/animation, as well as the video editing arrangement.
I've tried storyboarding in the past, and I still lack in a
lot of ways, which made me scratched my story board and go to
draw my small comic project right away. However, after the
video, I feel like I would like to try to make storyboards
again. Somehow the project seems like a fun and interesting
challenge for me to do in the near future.
Quiz Result
First attempt: 10/10
fig 2.5.1 Week 3 Quiz Result, week 4 (18.5.2024)
Week 4 Asynchronous Class Reflection
- Pre-production: This is the planning stage of filmmaking, where all the necessary preparations are made before filming begins. This includes tasks such as writing the script, creating storyboards, casting actors, scouting locations, designing sets and costumes, and hiring crew members.
- Production: This is the stage where the actual filming takes place. The production team will work together to capture all the footage needed for the film, using the plans and preparations made during pre-production as a guide. This stage can be physically and logistically challenging, as it involves coordinating a large team of people and managing a complex schedule.
- Post-production: This is the stage where the footage is edited and assembled into a final product. This includes tasks such as cutting and arranging scenes, adding music and sound effects, color grading, and visual effects. Post-production can be a time-consuming process, as it requires careful attention to detail and a keen eye for storytelling.
- Director: The director is responsible for overseeing the entire production and ensuring that the creative vision for the project is realized. They work closely with the cast and crew to block out scenes, direct the actors' performances, and make creative decisions about the look and feel of the film.
- Producer: The producer is responsible for the logistical and financial aspects of the production. They secure funding, hire the crew, coordinate the schedule and locations, and ensure that the project is completed on time and within budget.
- Cinematographer: The cinematographer, also known as the director of photography (DP), is responsible for the visual aesthetic of the film. They work closely with the director to choose the right camera, lenses, and lighting to achieve the desired look and mood for each scene.
- Production Designer: The production designer is responsible for the overall visual design of the film, including the sets, costumes, and props. They work closely with the director and cinematographer to create a cohesive and immersive visual world for the story.
- Sound Designer: The sound designer is responsible for the audio aspects of the film, including recording and editing dialogue, sound effects, and music. They work closely with the director and editor to ensure that the sound and picture are seamlessly integrated.
- Editor: The editor is responsible for assembling the footage into a coherent and compelling story. They work closely with the director and sound designer to shape the pacing, tone, and structure of the film.
Quiz Result:
Production Stages
Attempt 1: 5/5
Production Crews
Attempt 1: 5/5
fig 2.6.1 Week 4 Quiz Result, week 4
(19.5.2024)
Project 1A: Audio Dubbing
We finally started to work on our first project, which is to
audio dub a certain clip from the movie "Everything,
Everywhere, All at Once". We were given a muted video of the
clip by Mr Martin, and our job is to give different kinds of
sounds, starting from ambient sounds, hard sounds, and even
our own voice as dubbing for the characters.
fig 3.1.1 Raw video given by Mr Martin, week 3
(7.5.2024)
Before we start to work on the clip on Adobe Premiere, the
first thing we need to do is to make the spreadsheet for the
list of sounds we need to get for the dubbing.
I listed the details of what is within a scene within specific
seconds, and then look for any suitable audio I can get from
the limited options on YouTube, and pasted the link on the
spreadsheet for future reference.
After the sheet is done and all sound effect was done, I proceeded to record my own voice, while referencing back and forth to the original movie. Not only I have to do voiceover for 2 elderly woman with deep voice, I have to dub the voice of a man.
I try to mimic the tone that the characters made in their
dialogue as close as possible, and I am embarrassed and
laughed at how weird and silly my voice sounded. Not only
that, I had to cover myself under a blanket to reduce as much
as I can the white noises from my room.
Apparently I could just prepare the spreadsheet in class, but
I thought I had to do it before. That worked in my favor,
because Mr Martin gives out extra credits to whoever has done
the spreadsheet beforehand.
In class, Mr Martin also taught us on how we could add the
sound effects into the clips on Premiere Pro, and how to add
some sound transition using sound effects on the audios of we
need to. Mr Martin gave us time to work on our projects, but
he noted that he wants STRICTLY no music, or he'll deduct our
credit, so I have to keep that in mind.
I started to open Premiere Pro and and put the raw muted video
first. And then I started to put the dubbing I made, and
cutting the parts to their respective timing. Now, Mr Martin
taught us how to change the pitch of our voice, which is by
Sound Effect > Time and Pitch > Pitch Shifter
fig 3.1.3 Modifying the pitch of my dubbing on the
clips, week 4 (13.5.2024)
fig 3.1.4 My dubbing's timeline, modified with pitch
shifter, week 4 (13.5.2024)
I took quite a long time to make sure all voice are evened
and balanced, and then proceeded to add the sound effects.
Now, adding the sound effects also has a similar grindy
feeling to it, considering there are lots of sounds that I
need to put in the timeline, plus the fact that I have to
tweak their volumes too, because some sounds are gonna
blast your ear, and some sounds are too quite to actually
fit what's happening in the video.
Lastly, I added the ambience sound. For this one, since I
think the ambience is just gonna be typical office noises
for both, since it's just a door away, I just cut the
audio every time the scene location changes. When the
scene is inside the closet/storage room, the ambience
sound is much quieter, and the storage room is basically
quiet. But when it goes to the scene on the center of the
office, I increases the voice and make it more loud,
because obviously the characters were in the center of the
room with all the clattering noises from everywhere, so it
makes total sense. But, for the specific scene when evil
Deirdre opens the door to come inside, I go to the effect
control and use keyframes to gradually increase the volume
of the ambience.
fig 3.1.5 tweaking sound effect for the clips, week 4 (13.5.2024)
The last thing I need to do is to review all the audios,
and making sure all audios are how I want them to be
(excluding the very weird pitch of the characters), and
the clip can be exported and ready to go!
Final result
fig 3.1.6 Audio Dubbing Project Final Result, week 4
(13.5.2024)
Project 1B: Sound Shaping
In project 1B, we are required to record our own voice for 5 seconds
and shape them into these effects:
- Voice of phone call.
- Voice coming from inside of closet.
- Voice of toilet/bathroom.
- Underground cave.
- Alien/ Orc voice
Since we didn't get to have a physical tutorial due to public
holiday, I had to learn on how to work on Adobe Audition by myself
using the tutorial video given by Mr Martin.
The way we do it is that we can make a new multitrack file, and
then import our audio file in there.
Here is my original recorded voice audio track:
fig 4.1.1 My raw audio file for Sound Shaping project, week
15 (31.7.2024)
What I noticed about my audio is that it's a bit small and I am
sure that there will be a lot of ambient noise in the background
because I can also hear a lot of background noise in my room with
naked ear.
So the first thing that I need to do is to amplify the voice and
to denoise the track. It took me not too long to figure out how to
do it, and it was quite the easy and straightforward process.
fig 4.1.2 Amplifying and cleaning up my audio, week 15
(31.7.2024)
fig 4.1.3 My cleaned audio track, week 15 (31.7.2024)
Now that the audio is cleaned enough, it is ready for me to edit further into different kinds of voice effects.
The first one is the phone audio. For this effect, I just
followed the process according to the tutorial video (Filter
and EQ > Parametric Equalizer), and adjusted the graph
according to how I see fit.
fig 4.2.1 Making phone call effect, week 15 (31.7.2024)
fig 4.2.2 Making my muffled audio track, week 15 (31.7.2024)
Next up is the effect of voice inside a bathroom. For this, just
like shown in the tutorial video, I applied the reverb effect to
the track. For the bathroom voice, I used the 'Depressing
Karaoke Bar' effect and adjusted the sound so it won't be too
echo-y.
fig 4.2.3 Making my bathroom audio track, week 15
(31.7.2024)
I personally feel like the Ethereal effect is a bit too unnatural
for a cave echo. So I adjusted a bit here and there so the echoing
is a bit more subtle, but still shows a sense of empty and long
space in the surrounding.
fig 4.2.4 Making my cave audio track, week 15 (31.7.2024)
Last but not least is the Alien/Orc sound. Now this one is a bit tricky. I decided to make the alien noise, but the idea of an alien noise itself is a bit ambiguous. But I try not to think too much of it and try out some of the effects in my disposal because the alien sound isn't included in the tutorial video.
So after some thinking, what I decided to do, is to make my pitch
just a tad bit higher, and use a funny effect from the Modulation
> Phaser > Underwater Effect
fig 4.2.5 Making my alien audio track, week 15
(31.7.2024)
Final Results
Phone sound:
fig 4.3.1 My voice with phone sound effect, week 15
(31.7.2024)
Inside the closet sound:
fig 4.3.2 My voice with inside the closet effect, week 15
(31.7.2024)
Bathroom sound:
fig 4.3.2 My voice with inside the closet effect, week 15
(31.7.2024)
Cave sound:
fig 4.3.2 My voice with inside an underground cave sound
effect , week 15 (31.7.2024)
Alien sound:
fig 4.3.2 My voice with inside the closet effect, week 15
(31.7.2024)
FEEDBACK
Week 2
- The 3/4 angled medium shot is wrong. It's supposed to be medium close-up, not medium shot.
- The low angled wide shot needs to have your feet visible in the shot, do not crop it.
- The background might not be too blurred but it is a bit blurred enough, and you can still kind of see the depth of the shot in there, so it's okay.
Experience
The exercises that Mr Martin gave us was very exciting, and it also
helped us to get used to the applications that we use to work on out
tasks. But some of them gave me a funny feeling. The adding captions on
Premiere Pro exercise requires me to use my own face to edit on. I for
one am not very comfortable in showing my face on video or camera,
because I don't consider myself as a very photogenic person, plus my
face was not in the best condition at the time of shooting. What makes
it even worse is that we had to actually shoot our face up close for the
shots exercise. I just did it cuz I had no choice, but I was internally
screaming because not only I was so sleep deprived at that time, that
day was the one day that I decided not to put make up on because I was
too lazy. (I'm so disappointed at myself at that day lol).
The audio dubbing is also a very funny and weird experience to me. Not
only I had to use my high pitched voice that doesn't even match any of
the characters I had to dub, I also had to tweak the pitches to voice
over several character. My voice in the final result are so funny and
weird that I was dying of cringe when I had add and edit the voices,
especially since I had no choice but to listen to my own weird pitched
voice numerous times to fit the timing correctly. The exercise itself
was a fun one even though I spend quite a long time working on it, but I
would love it more if I don't have to listen to my own voice for it lol
Observation
I didn't get the chance to look at my peer's work on these exercises,
but I trust that if we pay attention well and willing to try out and
experiment on the tools a little bit, we won't have any issues working
on the exercise. I also learned some new things and features from
Premiere that I never knew was there. It was quite complex, so I can see
how I can get confused if I had to learn it alone. But when I understand
the rough idea, it can be really helpful in doing many kinds of editing.
Findings
From this exercise, I found out that there are a lot of tools in
Premiere Pro that could help us in editing our videos. Some are a bit
more challenging to use than others, but the options are quite vast so
there are a lot of things we can do and combine to achieve the result
that we desire.


Comments
Post a Comment