Advanced Animation - Exercises
24.9.2024 - 12.11.2024 (Week 1 - Week 7)
Vanessa Kei Kurniadi / 0360525
Bachelor
of Design (Hons) in Creative Media
Advanced Animation - Exercises

INSTRUCTION
Exercise 1: Bouncing Ball
In this exercise we were instructed to make a bouncing ball animation for several types of ball: Soccer ball, ping pong ball, bowling ball, and beach ball. For week 3 deadline, we're only instructed to make a solid non-stretch ball since the squash-and-stretch ball is gonna be taught in week 3's class.
First off we were taught the basics, including how we can apply a bone structure to move a shape to it's desired form. This technique will be useful when we need to apply complicated forms like a full body character.

fig 1.1 applying bone to a shape
Now we proceeded to learn how to make a basic bouncing ball animation. In class, we were taught step by step on how to make a soccer ball bounce animation.
PROCESS
Soccer:
First, we need to determine the location of the camera and how wide the view is. Then we set the initial position of the ball to the top left area (keep in mind to leave the 4 direction arrow at the bottom and use the outer ring. For some reason, the axis are messed up, making it hard to animate when we're focusing on the axis). Use "K" key, and set a keyframe on the location of ball in frame 1.
Second, drag the ball to the floor/base, and make another keyframe in the selected frame (in my case, it is frame 14). Then the final animation will be the ball moving in a straight diagonal line.
This is where we need to go to the graph editor to edit the graph, making some sort of arc going down. Then update the path to see the changes. The graph will affect the ball to make a more natural fall.
Then move the ball to it's next peak position after the bounce, and add a keyframe on the selected frame again, and edit the frame again. Note that just like other arcs in Illustrator or Photoshop, the arcs in the graph will change when we tried to pull one end of the anchor. To fix it, right click on the anchor and set the anchor to "free", so it won't affect the other arc.
Repeat the process several time and keep updating the process to make other bounce, and at the end, make the ball roll on the ground off the camera.
When the bounce is ready, all that is left is to make the rotation to make the rolling animation.
I asked Mr Kamal and what he recommended was to make a constant rotation from the start till the end of the bounce, and then make the rotation a bit slower when the ball was only rolling at the end. So the keyframe was essentially done in the start of the bounce, the end of the bounce, and the end of the roll.
(Most of the process are done in class, and since I am trying to keep up with the tutorial, I don't have much process footage of the animating process)
After all the paths are done, I checked the reference video Mr Kamal gave to see if the bouncing animation already looks natural. He gave us a video from YouTube for reference.
I spent some time to adjust the tempo and the distance of the bounce, making it as close as natural as possible. Obviously, the ball I'm making doesn't get affected by the wind or the uneven surface, so I just try to imagine how the ball movement will be without those factors.
Reference:
fig 1.2 Soccer ball reference

fig 1.3 Making the soccer ball bouncing and rolling animation
Here is the result:
fig 1.4 Final result for soccer ball bouncing animation
Ping Pong:
(I decided to make separate files for each of my animation because for some reason the "rig UI" seems to disappear at some point.)
I had to watch the ping pong bounce tempo so many times to get the feeling of how fast the ball is. A ping pong ball's bounce is more sharp and fast compared to the soccer ball. In addition, the difference of peak height for each bounce are more subtle than the soccer ball, making it bounce a lot more before rolling flat on the ground.
From the reference, the ball seems to be moving back and forth, but it is most like due to the uneven surface which it the table, so I can to remove that factor from my animation.
fig 2.1 Ping pong ball bouncing animation reference
From this reference, I try to make my ball bounce a bit stronger (make the peak height a bit taller than it was with the soccer ball), and make the distance between each landing closer to each other. Then I try to add some rotation to make the ball roll in a natural way.

fig 2.2 Making the ping pong bounce

2.3 Making the ping pong rotation
To make sure, I check and reviewed the animation numerous of times to see if it looks natural. I spent around 30 more minutes doing minor tweaking here and there to make the ball as natural as possible with my judgement and skills.
Here is the final animation:
fig 2.4 Final result for ping pong ball bouncing animation
Bowling:
fig 3.1 Bowling ball bouncing reference
I've always known that a bowling ball's bounce is very low because the ball itself isn't supposed to be bouncing when played. But when I looked into the reference video, I didn't realize how good it is to reduce its bounce. It literally reduced about 70-80% of the initial height, and stayed on the ground after exactly 3 bounces.
I try to apply my knowledge from my observation and try to make the ball bounce as naturally as possible.
Even though the bounce is kind of different from the rest of the balls, it is still fundamentally the same method of rigging. I just need to make sure the graphs are flowing a bit sharper than the soccer to make a quicker bounce like how a bowling ball is supposed to be.

fig 3.2 Making the bowling ball bounce
I had this problem where even though it was not in the path, the ball just zoomed out of the camera view. It wouldn't be such a noticeable problem if I could find the keyframe and make it move slower. But fortunately, after I cleared out the keyframes and made a new one, the invisible path disappeared.
(I noticed later that this problem might have happened because I accidentally made the x graph linear all the way, which makes the ball roll infinitely)
Here is the result:
fig 3.3 Final result for bowling ball bouncing animation
Beach Ball
fig 4.1 Beach ball bouncing reference
The beach ball isn't like what I expected at first. Apparently, the beach ball that we're doing is one that kind of "floats" in the air a little bit. So the bouncing will be a bit quick, but the air-time will be a lot more apparent and slower than the other balls.
So to do this, I need to make the graph to look more like round mountains, which will make it stay airborne a bit longer than the other balls.
Other than that, nothing much is different, especially for making the rolling animation.


fig 4.2 Making the bouncing and rolling animation of the beach ball
Here is the final result:
fig 4.3 Beach ball bouncing animation final result
Here is the combined version to see all the results at once:
fig 5.1 Combined final result
Squash and Stretch
For the squash and stretch, the process is a bit more tricky.
The method that Mr Kamal taught us is to make the ball rotate to the desired angle, and then use the 2 opposite polar to make the ball squash or stretch.
What I did do wrong in the start of the exercise, is that I used a soccer ball to make the squash and stretch animation. I was too focused because for some reason the ball kept making a very weird sudden turn in angle, which makes it look very weird in the overall animation. So I tried to just use the 2 pillars to make the ball "jump" instead of rolling.
By the time I noticed the reason sir used a blue plain ball, I was already halfway through my own method of working, so I just changed the ball pattern and continued with my method.
fig 6.1 Initial squash and stretch result
I checked with Mr Kamal and he said the method also works, but it requires me to make more keyframes than if I were to use sir's method.
Mr Kamal said my first result's ball was a bit wobbly on the first bounce. So Mr Kamal helped me to tweak the movements a bit to make it smoother as well as telling me the tips to make the ball look smoother.
So at home, I tried to make some adjustments to make the ball not wobble mid-air.
Here is my second result:
fig 6.2 My second result for squash and stretch
After I looked at the animation once more, I felt like there was a little more tweaking that could be done to make the bounce just a little bit better. So I made just some minor adjustments and resubmitted my work. There aren't many changes from my previous work, it's just that I feel like the minor changes helped the overall animation to be slightly smoother.
Here is my final result:
fig 6.3 Final result for squash and stretch plain ball

fig 7.1 Making the pendulum swing

fig 7.2 The swing gets weaker over

fig 7.3 The pendulum completely stops at the end, with all rotation balls having 0 rotation

fig 7.4 Making sure the tail stays at the starting location on the first swing

fig 7.5 Adjusting the graphs to make a natural swing
fig 7.6 First result for the pendulum
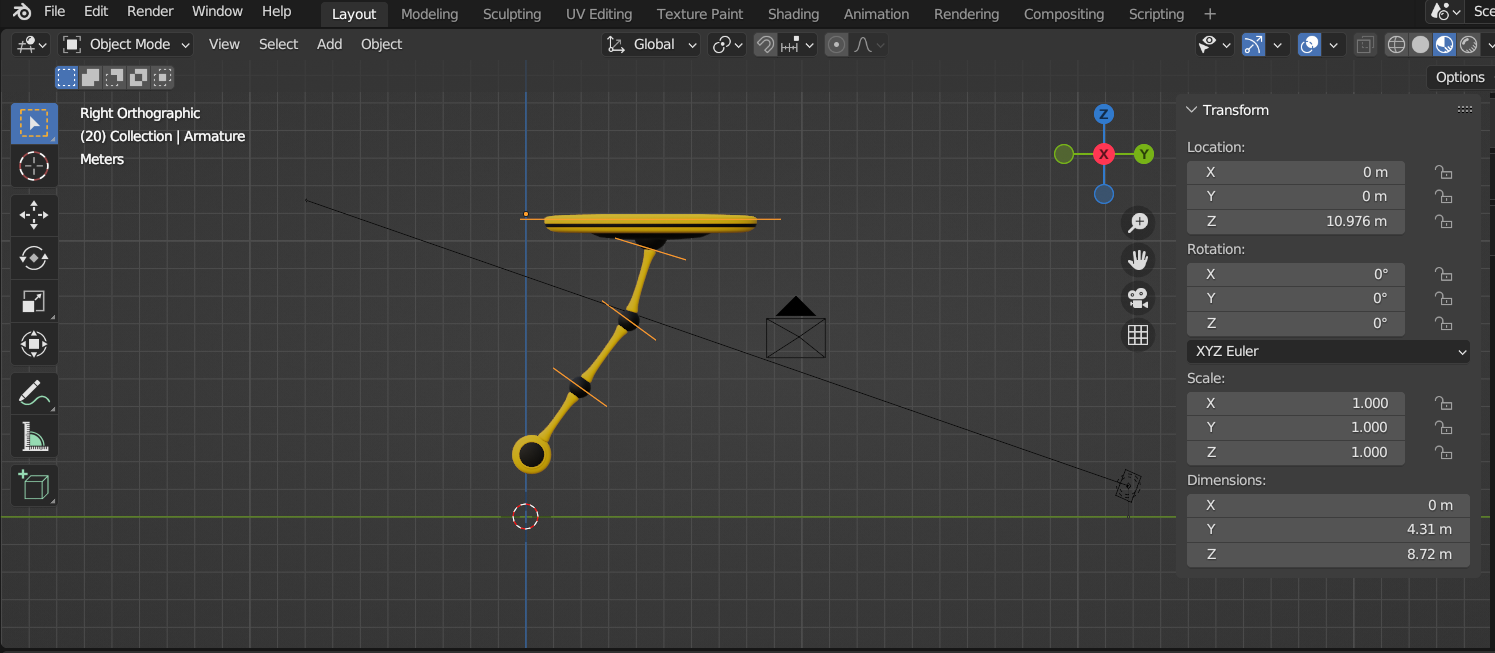
fig 7.7 Fixing the first drag
Exercise 3: Good Poses
For this exercise, we are to make 1 pose for each of these emotions: happy, sad, scared, and angry.
For each pose, we need to look for references and study the pose, in terms of silhouette, line of action, balance, etc.
And then, we should make our own pose with the Snow model that Mr Kamal chose from the internet.
Happy Pose
Reference:

fig 8.1 Happy pose reference
I chose this pose from the internet because it shows a strong happy emotion shown by the body gesture. Here is what I learnt from making the silhouette and the line of actions.


fig 8.2 Silhouette and the line of actions of the chosen pose reference
Even in the silhouette, it is clearly shown that the person is making a victory pose, which can very well be related to a happy pose. The line of action shows that this person bends his waist a little bit showing a stronger gesture of his raised hand, and emphasizes the overall posture even more.
The weight point and the balancing is done in the leg area. The feet serve as a balancer, but most of the body weight is directed to the knees area. In this case, the right knee might receive more body weight considering the direction of the body tilt, but the weight difference for the other knee shouldn't be much difference, because the body is only bent a little bit.
My first step is to make the legs bent over into a kneeling position, and then use the kneecap arrow to spread the knees in the opposite direction. This way, the feet are still close to each other, but the knees are spread open to make some kind of a tripod stand.
I also make the body bend over to the right side a little bit just like in the reference to further emphasize the gesture.

fig 8.3 Positioning the legs
I also changed the expression by using the pose library that is provided in the work file. I made it as best as I could ith the given expressions, and this is what I made.

fig 8.4 Making the facial expression
I made the upper body bent to the back a little bit to make it as if Snow just slid to the ground making his victory pose. I also adjusted his head position a little bit and made it look up a bit more than the default one. This is more realistic because usually, people look up in this kind of pose as if they're screaming for the world to hear

fig 8.5 Adjusting the upper body and the head
After the legs and body are done, I try to play around with the arm position to make it as close as I can to the reference photo.
Since snow clearly isn't carrying a suitcase, I just make it into another fist and place it where I think it will fit the overall pose, and this is what I came up with:


fig 8.6 Adjusting the arm position
When the pose is done, I set up the "stage" with some planes, and then add the lighting.
I chose a black coloured background because I think it'll make the lighting stand out more, which will help to set the "atmosphere" of the scene better.
The 4(?) lightings provided in the video are also a bit too bright and strong for me, so I removed them all and made my own area lightings. I used some sort of orange colour for the lighting because usually happy moments are given a warm colour palette.
Here is the final look before it is rendered:

fig 8.7 Final look before render
Sad Pose
Reference

fig 9.1 Sad Pose Reference


fig 9.2 Silhouette and the line of actions of the chosen pose reference
So on Blender, I tried to make out the basic pose and shape the spine to make him "curl up". I made sure the back is more "reclined" from the butt, so the back will be held by the wall that I'll set up behind him.
And since I'm going to make him look a bit down, it will be a good idea to modify the expression first so I won't have to move the limbs again later. For this, I used the base given in the pose library and tweaked the eyes a little bit to make it more "sad"


fig 9.3 Shaping the expression and base pose
Angry Pose
Reference

Scared Pose
Reference

reference

Making character sit down


Making facial expression and hand pose


adjusting the arm and shoulder position

Adjusting the legs
Result 1:

fig Happy Pose
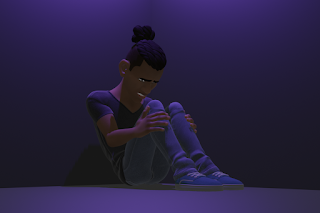
fig Sad Pose
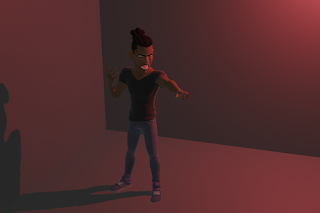
fig Angry Pose
FEEDBACK
Week 1
- Update your Blender app
Week 2
- I think the ball is a bit slow at the start. You can look for references and then adjust the timing of the bouncing.
- For the rolling, you can just set it at the start and the end of the bouncing animation, and then when the ball is rolling, you can make it a bit slower.
Week 3
- There is like a wobble in one of the bounces, and since you're using a different technique you will need to make more keyframes.
- Try to adjust the location to make it as tidy as possible, so it can make a clean movement for that specific peak height
Week 4
- You just need to make the base move to the right once, and then make it swing back and forth until it stops. If you drag the base several times it will only give you more work.
- Just make sure to watch how the pendulum moves to make it natural
Week 5
- Make sure the first drag on the tail doesn't exceed the original point, so it will look like the tail is getting dragged
- Need to change to the older version of Blender cuz the latest version is a bit buggy for the layers for the pose
Week 6
- You should use the ankle rotator that is provided to make it easier to pull the feet up or down.
- The steps are a bit too far
- Just need to follow the frames like it was during 2D animation, and then after that can just loop the rest.
- Better to redo the animation process to make the revision easier


Comments
Post a Comment